Monday, June 25, 2018

Raspberry PI Zero and Raspberry PI Zero W

Heard of a US$5 dollar cheap PC for a long time - Raspberry PI Zero, but haven't have a chance to get in touch in 1 with the said price in Malaysia. Finally, bought my self a Raspberry PI Zero from a local online store for RM20 and a WIFI version for RM40. Those who are interest as well can refer to the link below :


I personally prefer Raspberry PI Zero with WIFI as it's easier to get connected to the internet for configuration. To setup the the Pi, you can download the respbian images from the following location :


I shall put on the steps in a separate blog entry later for setting up the PI. So please stay tune with me. 


Wednesday, February 07, 2018

Trading CryptoCurrency in Malaysia.

Image result for cryptocurrency
There are many platform available for trade among different types of CryptCurrency / Coins, for example, BitCoin, Ethereum, Ripples, Dash Coin, LiteCoin, Tron, Neo, etc. However, to get started to trade, you need to at least have some coins. It's seem not a straight forward task for us as a Malaysian. However, In my another post, i've introduce how to buy some BitCoin / Ethereum :


To enable to start trading more variety of Crypto Currency, you may refer to the following :

Binance : Trading variety of Crypto Currency in Malaysia

You can open account in Binance, and deposit your Bitcoin / Ethereum directly using the fund wallet address provided in Binance during your purchase in platform like Remito.  From Binance, you are then able to trade others Crypto Currency as mentioned above. 

* CryptoCurrencies are high risk financial instrument. This article only provide information as it is. The Writer shall never bare any consequences on any actions taken by the reader.

Buying Crypto currency (Bitcoin, Ethereum) in Malaysia

Image result for cryptocurrency buying
Due to the price spike for Bitcoin last year (2017), it attracted a lots of eyeball to eyes on crypto currency like BitCoin (BTC), Ethereum (ETH), Dash Coin, Lite Coin, etc. As a IT profession that involve very much into IT world, I've been ask by many friend on CryptoCurrency and therefore, started to do some research on it.

As a Malaysian, I found that it's not that straight forward for Malaysia to buy CryptoCurrency. In fact there is less platform available for us. Following are the 2 platform that's available for us to buy CryptoCurrency :


However, referring to the above platform, we can only buy BitCoin (BTC) and Etherem (ETH) at the moment, to buy / trade others coin like Ripples, Tron, NEO, etc, there are still some steps need to be carry out which i am going to share in another post : 


* CryptoCurrencies are high risk financial instrument. This article only provide information as it is. The Writer shall never bare any consequences on any actions taken by the reader.

Sunday, November 26, 2017

Running Docker in my OrangePi Lite


Fascinated to mini PC for sometimes already. Only recently have some free time to play around with my long purchased OrangePi Lite. As an alternative for Raspberry Pi, I got my H3 ARM, Cortex-A7 Quad Core, 512mb RAM OrangePi Lite, for less than USD$14. After tried several way which didn't work, i have found the following setup are able to run Docker : 

1. download the armbian server image using the following link :
    https://www.armbian.com/orange-pi-lite/
2. burn the image using Win32DiskImage into a SD card with minimum 8GB storage
3. Plugin the SD card into the OrangePi Lite slot and start the OrangePi.
4. Following the instruction on the screen to configure your account and finally reboot the device. 
5. Run "armbian-config" to configure WIFI connection.
6. Within armbian-config, switch to use to use Dev builds instead of stable build.
7. run apt-update and then apt-upgrade.
8. reboot the device. After reboot, we are ready to setup docker.
9. Use the following steps to setup docker :
    i. Install packages to allow apt to use a repository over HTTPS:
$ sudo apt-get install \
    apt-transport-https \
    ca-certificates \
    curl \
    software-properties-common

    ii. Add Docker’s official GPG key:


$ curl -fsSL https://download.docker.com/linux/ubuntu/gpg | sudo apt-key add -

    iii. Verify that you now have the key with the fingerprint:
9DC8 5822 9FC7 DD38 854A E2D8 8D81 803C 0EBF CD88,
 by searching for the last 8 characters of the fingerprint.
$ sudo apt-key fingerprint 0EBFCD88

pub   4096R/0EBFCD88 2017-02-22
      Key fingerprint = 9DC8 5822 9FC7 DD38 854A  E2D8 8D81 803C 0EBF CD88
uid                  Docker Release (CE deb) 
sub   4096R/F273FCD8 2017-02-22
    iv. Use the following command to set up the stable repository. You always need the stable repository, even if you want to install builds from the edge or test repositories as well. To add the edge or testrepository, add the word edge or test (or both) after the word stable in the commands below.
Note: The lsb_release -cs sub-command below returns the name of your Ubuntu distribution, such as xenial. Sometimes, in a distribution like Linux Mint, you might have to change $(lsb_release -cs) to your parent Ubuntu distribution. For example, if you are usingLinux Mint Rafaela, you could use trusty.
armhf:
$ sudo add-apt-repository \
   "deb [arch=armhf] https://download.docker.com/linux/ubuntu \
   $(lsb_release -cs) \
   stable"
    v. Install the latest version of Docker CE, or go to the next step to install a specific version. Any existing installation of Docker is replaced.
$ sudo apt-get install docker-c

    vi. Verify that Docker CE is installed correctly by running the hello-world image.
$ sudo docker run hello-world
This command downloads a test image and runs it in a container. When the container runs, it prints an informational message and exits.


Monday, November 20, 2017

Raspbian Pi for ORange Pi - Fully expand SD space

Following are the steps to expand the SD space within Raspbian Pi running in My Orange PI :

root@orangepi:~# fdisk /dev/mmcblk0

Command (m for help): p

Disk /dev/mmcblk0: 15.8 GB, 15804137472 bytes
4 heads, 16 sectors/track, 482304 cylinders, total 30867456 sectors
Units = sectors of 1 * 512 = 512 bytes
Sector size (logical/physical): 512 bytes / 512 bytes
I/O size (minimum/optimal): 512 bytes / 512 bytes
Disk identifier: 0x34605ba5

        Device Boot      Start         End      Blocks   Id  System
/dev/mmcblk0p1           40960      124927       41984   83  Linux
/dev/mmcblk0p2          124928     7170047     3522560   83  Linux

Command (m for help): d
Partition number (1-4): 2

Command (m for help): n
Partition type:
   p   primary (1 primary, 0 extended, 3 free)
   e   extended
Select (default p): p
Partition number (1-4, default 2): 2
First sector (2048-30867455, default 2048): 124928
Last sector, +sectors or +size{K,M,G} (124928-30867455, default 30867455): 
Using default value 30867455

Command (m for help): w

Theen quit (command q), reboot. You will then be able to use resize:

resize2fs /dev/root

df -h

Friday, June 23, 2017

How to ignore .php extention in url for Wamp and UWamp

Follow are the step to ignore .php extension in URL 1 :

  1. First, you need to enable the "rewrite_module" in your apache.
  2. Second, create a ".htaccess" file  inthe root folder of your web folder with the following contents :
Options +FollowSymLinks -MultiViews
# Turn mod_rewrite on
RewriteEngine On
RewriteBase /

# To externally redirect /dir/foo.php to /dir/foo
RewriteCond %{THE_REQUEST} ^[A-Z]{3,}\s([^.]+)\.php [NC]
RewriteRule ^ %1 [R,L,NC]

## To internally redirect /dir/foo to /dir/foo.php
RewriteCond %{REQUEST_FILENAME}.php -f [NC]
RewriteRule ^ %{REQUEST_URI}.php [L]

Thursday, March 09, 2017

Resetting User's password in Bitnami Gitlab using command line

Just for my own record or for someone that needed it :

First create a backup of your stack just in case :

sudo /opt/bitnami/ctlscript.sh stop
cd /opt
sudo cp -a bitnami bitnami_backup
sudo /opt/bitnami/ctlscript.sh start

After that just run the following to reset the user's password :


cd /opt/bitnami/apps/gitlab/htdocs
echo 'u=User.find_by_id(1); u.username="NEW_USERNAME"; u.save!;' | RAILS_ENV=production /opt/bitnami/ruby/bin/ruby /opt/bitnami/apps/gitlab/htdocs/bin/rails c
echo 'u=User.find_by_id(1); u.password="NEW_PASSWORD"; u.save!;' | RAILS_ENV=production /opt/bitnami/ruby/bin/ruby /opt/bitnami/apps/gitlab/htdocs/bin/rails c

Tuesday, February 28, 2017

Updating Bitnami Redmine

Image result for bitnami redmine
Recently just went through upgrading Bitnami Redmine (1.0.2 to 3.3.2). Following are the steps for my own record, and hopefully might be helpful for others as well. :

Information 


  • installation directory is /opt/bitnami.
  •  main folders that you can find inside 'apps/redmine' are the following:
• conf: folder that includes the apache configuration files for redmine
• htdocs: this folder includes the redmine files (Gemfile and Rakefile files, redmine configuration files, plugins folder, gems, etc).

  • The location of the redmine configuration files (database configuration, email settings, etc) is the 'apps/redmine/htdocs/config' folder.


Upgrading Process


1. Backup existing redmine DB

mysqldump -u root -p bitnami_redmine > /home/bitnami/wordpress_backup.sql

2. Copy the database backup to the new Bitnami version server. using "WinSCP"

3. Stop all services and restart MySQL service
sudo /opt/bitnami/ctlscript.sh stop
sudo /opt/bitnami/ctlscript.sh start mysql
3a. if you found that u unable to login to the root account, youmay need to carry out the following steps to reset the MySQL root's password:

  • Create a file in /home/bitnami/mysql-init with the content shown below (replace NEW_PASSWORD with the password you wish to use):
  •  UPDATE mysql.user SET Password=PASSWORD('NEW_PASSWORD') WHERE User='root';
     FLUSH PRIVILEGES;
  • If you are using MySQL 5.7 only, use the following content instead of that shown above:
  •  UPDATE mysql.user SET authentication_string=PASSWORD('NEW_PASSWORD') WHERE User='root';
     FLUSH PRIVILEGES;
  • Stop the MySQL server:
  • sudo /opt/bitnami/ctlscript.sh stop mysql
  • Start MySQL with the following command:
  • sudo /opt/bitnami/mysql/bin/mysqld_safe --pid-file=/opt/bitnami/mysql/data/mysqld.pid --datadir=/opt/bitnami/mysql/data --init-file=/home/bitnami/mysql-init 2> /dev/null &
  • Restart the MySQL Server 
  • sudo /opt/bitnami/ctlscript.sh restart mysql
  • Remove the Script
  • rm /home/bitnami/mysql-init
    

4. Login to MySQL and rebuild the DB
 mysql -u root -p 
mysql> drop database bitnami_redmine;
mysql> create database bitnami_redmine;
mysql> grant all privileges on bitnami_redmine.* to 'bitnami_redmine'@'localhost' identified by 'DATABASE_PASSWORD';
mysql -u root -p bitnami_redmine < backup.sql
5. Edit the Redmine configuration file to update the database user password (the same that you set previously) "/opt/bitnami/apps/redmine/htdocs/config/database.yml"

6. Migrate the database to the latest version:
cd /opt/bitnami/apps/redmine/htdocs 
ruby bin/rake db:migrate RAILS_ENV=production
7. Copy the ""/opt/bitnami/apps/redmine/htdocs/files" folder from the old installation to the new one. 

8. Copy the folders from "vendor/plugins" directory into new installation directory, in "plugins" folder.

9. Check the plugins also support this new version and run the following command
ruby bin/rake redmine:plugins RAILS_ENV="production"
10. clean the cache and the sessions, then you are free to restart the services :
ruby bin/rake tmp:cache:clear
ruby bin/rake tmp:sessions:clear
 sudo /opt/bitnami/ctlscript.sh restart

Wednesday, July 06, 2016

Setup gitolite in D-Link DIR-620 router running openwrt

Related image
It's been some while that i flash my D-Link DIR-620 router with openwrt, but never have additional feature except tried to setup a torrent with it. Just tried to setup a gitolite server with it and hope that someone else will find it useful for following information:


  1. Setup USB Storage. In this case i am using a 8gb USB thumb drive using the following command (i have formated my usb drive into ext4 format):
  1. opkg install kmod-usb-storage block-mount kmod-fs-ext4
  2. Setup gitolite in the router using the following step :
  • Install necessary components
  • opkg install git perl perlbase-essential perlbase-getopt perlbase-findbin perlbase-cwd perlbase-config perlbase-file perlbase-data perlbase-bytes perlbase-xsloader openssh-keygen perlbase-hostname perlbase-fcntl perlbase-io perlbase-symbol perlbase-selectsaver perlbase-errno perlbase-base
  • Backup authorized_keys file if exist
  • cp -p /etc/dropbear/authorized_keys /etc/dropbear/authorized_keys_backup
  • Create directory under mnt and mount usb drive
  • mkdir /mnt/usb
  • mount /dev/[sda2]/mnt/usb
  • Move root to usb and create link
  • cd /
  • mv root /mnt/usb
  • ln -s /mnt/usb/root root
  • Download gitolite 
  • cd /root
  • git clone git://github.com/sitaramc/gitolite
  • Install a link to gitolite executable into /usr/bin
  • gitolite/install -ln /usr/bin
  • create gitolite logfile directory
  • mkdir /root/.gitolite
    mkdir /root/.gitolite/logs
  • Copy your ssh public key to root, you may use puttykeygen tools to get the single line public key and paste to a new file via vi command
  • vi yourname.pub
  • Setup gitolite
  • gitolite setup -pk yourname.pub
  • now you can remove the public key file and create a link to /root/.ssh/authorized_keys in /etc/dropbear/authorized_keys
  • rm yourname.pub
  • rm /etc/dropbear/authorized_keys
    ln -s /root/.ssh/authorized_keys /etc/dropbear/authorized_keys
  • now you can admistrate your gitolite by cloning the gitolite-admin repo
  • git clone root@OpenWRTBox:gitolite-admin

Tuesday, June 07, 2016

Alternative Solution for Homily Charting Tool Bug

I just notice that this doesn't happen to me alone, that after you inserted some text into the Homily Charting Tools and Save it, the chart will turn out like following:


Therefore, i would like to share out a small tool to help me resolve the problem. Just follow the following instructions :

1. download the following file (fix.exe) and save it in your "Homily Software folder\xg1\lne", for example "C:\Program Files\Homily Software\xg1\lne"
2. You may want to create a shortcut for the file fix.exe in your desktop.
3. That's it, every time you have this kind of black candles, just double click at fix.exe in your desktop.
4. Wolah... the chart can be display correctly now as following :


And again, it's provided FREE and use it at your own risk.

* Warning!!! Before running the tools, you might want to backup the files in Your Homily Folder. I will not be responsible for anything going wrong.

Monday, February 29, 2016

Backup Favorites List from HLeBroking


1. Click on [start]  button, select on [run] , key in [regedit]  and click on  [ok]
button. 

2. Double click on  [HKEY_CURRENT_USER]

3. Double click on [Software],[Excel Force], [Cyber Stock for 2.5]

4. Select on [Favorites for(user ID)] and the Favourite Group would be 
displayed on the right     column.  

5. Click to [File] on the menu bar. Select [Export]. Save the file name as 
“My_Favourite.reg” on desktop. 

(Remarks: Please refer (step 1) to (step 5) for back up the stock counters 
on local PC. IF the stock counters missing on “My Favourite” (ecTrade), 
www.hlebroking.com), please proceed to the (step 6). 

6. Click [File] to on the menu bar. Select [Import]. Look for the 
“My_Favourite.reg” on desktop and click to [Open]. 

7. All the stock counters would be restored to the original location.

Thursday, December 31, 2015

Installing Print Screen feature to my china made pad (Homily WinPad)

just got my new Homily Winpad and figure out it doesn't have google play with it and unable to do a print screen. Therefore, i would like to share on how i add a print screen feature to my China made Homily WinPad.

1. Using the WinPad (Android) browser, download the following file
      http://bit.ly/1YV3pM0

2. Install the app accordingly


3. Configure the app so that it start automatically every time you start you WinPad in Android.


4. you can capture any screen from android using the combination following combination keys:
[Power]+[Volume Down] for 2 seconds.

Sample screen captured / print screen. Nice and Sharp.


It's FREE so, enjoy everyone and happy new year.

Monday, November 16, 2015

Playing around with Arduino UNO R3 clone from China

Recently, I've been looking and reading articles about Arduino UNO R3. Search from Aliexpress awhile, and i decided to buy a cheap Arduino UNO R3 clone to play around with. After waited for 2 weeks plus, i finally get the board which look similar to this with the word "UNO" only, instead of "DCcEle DCcduino UNO":


First of all, setting up the environment :
1. Download and install the USB-Serial Driver. Saw from the chip surface, mine is using a "WCH CH340G", therefore, need to download the drive and setup separately :

Driver for Arduino Clone with WCH CH340G

2. Setup and configure Arduino IDE

  • Run into problem while running the Zip version of the IDE at first. Now, it run well after configured the "sketchpath" in "preferences.txt" located in the "lib" folder

After everything is set, and when i plug in the board, all i found is that i can compiled and verified my "Hello World" sketch successfully, but, the upload is unsuccessful. After a few digging, finally found the solution for it :


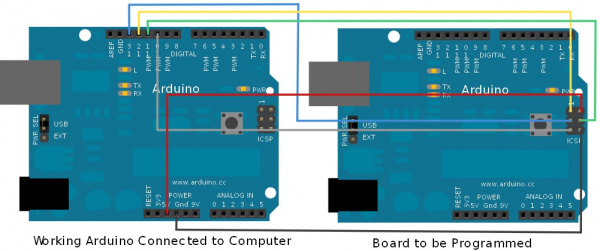
  • Luckily, i have a friend with a working UNO R3. Therefore i am using his Arduino UNO R3 as ISP.
  • First i open the example sketch "ArduinoISP" provided inside the IDE.
  • Upload the sketch into my friend's working board.
  • I connect my board as following :
alt text
  • Select "Arduino as ISP" as programmer
  • Select the serial port for the working Arduino
  • Press "Burn Bootloader"
Magic Happen... it seem like my cheap Arduino UNO R3 i bought from Aliexpress is not loaded with bootloader. And now, it's work flawlessly.

.

Tuesday, May 05, 2015

View your Android Screen remotely in you PC without additional devices.


This is one of the way i found out to view screen of my Android device in my Windows PC wireless-ly and FREE-ly without any additional device. I found that it's useful when i am presenting some android app and feature during the presentation. and further more it's FREE and only with few lines of command. And here is it :

1. download and extract a java app from the following URL :
    http://droid-at-screen.ribomation.com/download/
2. To run the app, you need to have java run time configured which i am going to discuss here.
3. Run the java app above and connect your android device via a USB cable. you should be able to see your android screen in your pc. However to make it run wireless, follow the following steps.
4. You need to find out what the ip address that's assigned to your android device. Under your command prompt, run "./adb shell" follow by "netcfg" and quite the adb shell by issueing "exit"
5. Then issue the command "adb tcpip 5555"
6. follow by "adb connect [device ip]:5555"
7. There you are, you are now able to disconnect the USB and start to view your android device screen without wire.

Hope you enjoy this FREE thing.

Wednesday, April 08, 2015

My footprint for making video

Recently due to some reason, i have been needed to make so video, some of the resources i found below are very much useful when creating a very impressive video. However, too bad, not all of it are FREE. Just for the records, there it is :

For getting some looping sound :
http://www.freesfx.co.uk/sfx/loop
http://www.audioblocks.com/
http://www.flashkit.com/loops/Ambient/Soundscapes
http://www.last.fm/

For getting some nice photo and video to embedded into your video :
http://www.shutterstock.com/video
http://www.revostock.com/Stock-Video/
http://www.dreamstime.com/technology-stock-video-footage-vcat103/pg1/
http://www.gratisography.com/
http://www.istockphoto.com/footage

Monday, March 16, 2015

Android Debugging Without Wire / Using WIFI


Recently i have involved in developing android app. Debugging using a device with USB connection has been a disaster for me as i have a loosen USB cable. Therefore have do some finding and here the solution to debug android app without using the USB Cable :

1.First connect your device via USB and make sure debugging is working fine. 
2.Second you need to find out what the ip address that's assigned to your android device. Under your command prompt, run "./adb shell" follow by "netcfg" and quite the adb shell by issueing "exit"
3. Then issue the command "adb tcpip 5555"
4. follow by "adb connect [device ip]:5555"
5. There you are, you are now able to disconnect the USB and start to debugging with wire.

To switch back when done , issue the following :
"adb -s [device ip]:5555 usb"


Wednesday, March 11, 2015

Useful FREE graphic tools for android development

Involved in some android app development recently. To make an app interesting, no doubt the image and graphics play a very important. As i am not a full time mobile app developer, nor a graphics designer, i prefer to search for some FREE tools that available to make my life easier while developing mobile application. Following are some of the FREE tool that i come across. Feel free to comment and recommend other tools that you find it useful.

Fotoflexer
Online-Image-Editor
Edit Photo For Free

And again, like always it's FREE... :>

Monday, October 13, 2014

Some OpenSSL Command for my own references maybe it's for you too

General OpenSSL Commands

These commands allow you to generate CSRs, Certificates, Private Keys and do other miscellaneous tasks.
  • Generate a new private key and Certificate Signing Request
    openssl req -out CSR.csr -new -newkey rsa:2048 -nodes -keyout privateKey.key
  • Generate a self-signed certificate (see How to Create and Install an Apache Self Signed Certificate for more info)
    openssl req -x509 -nodes -days 365 -newkey rsa:2048 -keyout privateKey.key -out certificate.crt
  • Generate a certificate signing request (CSR) for an existing private key
    openssl req -out CSR.csr -key privateKey.key -new
  • Generate a certificate signing request based on an existing certificate
    openssl x509 -x509toreq -in certificate.crt -out CSR.csr -signkey privateKey.key
  • Remove a passphrase from a private key
    openssl rsa -in privateKey.pem -out newPrivateKey.pem

Checking Using OpenSSL

If you need to check the information within a Certificate, CSR or Private Key, use these commands. You can also check CSRs and check certificates using our online tools.
  • Check a Certificate Signing Request (CSR)
    openssl req -text -noout -verify -in CSR.csr
  • Check a private key
    openssl rsa -in privateKey.key -check
  • Check a certificate
    openssl x509 -in certificate.crt -text -noout
  • Check a PKCS#12 file (.pfx or .p12)
    openssl pkcs12 -info -in keyStore.p12

Debugging Using OpenSSL

If you are receiving an error that the private doesn't match the certificate or that a certificate that you installed to a site is not trusted, try one of these commands. If you are trying to verify that an SSL certificate is installed correctly, be sure to check out the SSL Checker.
  • Check an MD5 hash of the public key to ensure that it matches with what is in a CSR or private key
    openssl x509 -noout -modulus -in certificate.crt | openssl md5
    openssl rsa -noout -modulus -in privateKey.key | openssl md5
    openssl req -noout -modulus -in CSR.csr | openssl md5
  • Check an SSL connection. All the certificates (including Intermediates) should be displayed
    openssl s_client -connect www.paypal.com:443

Converting Using OpenSSL

These commands allow you to convert certificates and keys to different formats to make them compatible with specific types of servers or software. For example, you can convert a normal PEM file that would work with Apache to a PFX (PKCS#12) file and use it with Tomcat or IIS. Use our SSL Converter to convert certificates without messing with OpenSSL.
  • Convert a DER file (.crt .cer .der) to PEM
    openssl x509 -inform der -in certificate.cer -out certificate.pem
  • Convert a PEM file to DER
    openssl x509 -outform der -in certificate.pem -out certificate.der
  • Convert a PKCS#12 file (.pfx .p12) containing a private key and certificates to PEM
    openssl pkcs12 -in keyStore.pfx -out keyStore.pem -nodes
    You can add -nocerts to only output the private key or add -nokeys to only output the certificates.
  • Convert a PEM certificate file and a private key to PKCS#12 (.pfx .p12)
    openssl pkcs12 -export -out certificate.pfx -inkey privateKey.key -in certificate.crt -certfile CACert.crt